
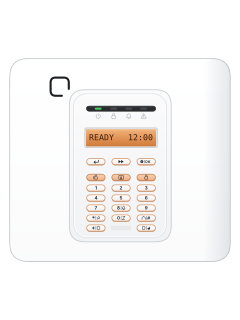
PowerMaster-10G2 panel (built-in keypad)

Visonic PowerMaster manuals
Start herePowerMaster-10/30 G2 Version 19.4 User's GuideUser guide · 77 pages · 1.6 MBRead it nowKeypad cheat sheet
Arm (away)the key with a padlock on ityour codethe key with a padlock on itthe key with a padlock on it
- PowerMaster-10/30 G2 panel: check READY. If NOT READY, press OK (beside the information symbol) and resolve the listed open zones or troubles.
- Press the closed-padlock key, then enter your code or present your tag when asked. No code is needed only if your installer turned on quick arm.
- Leave before the exit delay ends. The panel shows AWAY and its red ARM light stays on.
- KP-160: tap the top-right house/padlock button, then present your tag while it flashes. Green light and a happy tune confirm success.
- KP-140/141: press the house key with the closed padlock, then enter your code or present your tag. KP-250: see its own guide.
Pages 4 to 6, 9 and 10, 63, 69 of the PowerMaster-10/30 G2 Version 19.4 User's GuidePages 2, 11 and 12 of the KP-160 PG2 Keypad User GuidePowerMaster-10/30 G2 panel Closed-padlock key KP-160 House with padlock symbol KP-140/141 House key with the closed padlock Partitioned panel Press # and the intended partition number before the action Partitioned KP-160 Select the required P1/P2/P3 symbols before the action Arm while homethe key with a house with a person in it on ityour codethe key with a door on itthe key with a house with a person in it on it
- PowerMaster-10/30 G2 panel: HOME arms perimeter zones, leaving interior zones off. Use the house/person key.
- With perimeter zones ready, press that key, then enter your code or present your tag if asked. No code is needed only if your installer turned on quick arm.
- Move to an interior zone before exit time ends. The panel then shows HOME.
- KP-160: tap the top-middle door button, then present your tag while it flashes. Green light and a happy tune confirm success.
- KP-140/141: press the house key with a person on it, then enter your code or present your tag. KP-250: see its own guide.
Pages 5 and 6, 9 to 11, 63, 69 of the PowerMaster-10/30 G2 Version 19.4 User's GuidePages 2, 11 and 12 of the KP-160 PG2 Keypad User GuidePowerMaster-10/30 G2 panel House/person key KP-160 Top-middle door button KP-140/141 House key with a person on it Partitioned panel Press # and the intended partition number before the action Partitioned KP-160 Select the required P1/P2/P3 symbols before the action Disarmthe key with an open padlock on ityour codethe key with a house on itthe key with an open padlock on ityour code
- PowerMaster-10/30 G2 panel: press the open-padlock key, then enter your code or present your tag before entry time ends.
- The panel’s ARM light goes out. Disarming also stops the siren. MEMORY means there is an alarm record to read.
- If arranged for you, a duress code in place of your normal code disarms and sends a silent alarm to monitoring.
- KP-160: tap the top-left house button, then present your tag while it flashes. Green light and a happy tune confirm success.
- KP-140/141: press the house key with the open padlock, then enter your code or present your tag. KP-250: see its own guide.
Pages 5 and 6, 9 and 10, 17, 27, 63 of the PowerMaster-10/30 G2 Version 19.4 User's GuidePages 2, 11 and 12 of the KP-160 PG2 Keypad User GuidePowerMaster-10/30 G2 panel Open-padlock key KP-160 Top-left house button (open padlock in the manual) KP-140/141 House key with the open padlock Partitioned panel Press # and the intended partition number before the action Partitioned KP-160 Select the required P1/P2/P3 symbols before the action Bypass a zone
- Disarm first. Your installer must enable bypassing. KP-140/141 and KP-250: use their own guides.
- Panel: advance to USER SETTINGS with double-arrow; press OK, enter your code, then OK at SET ZONE BYPASS.
- Panel: find the zone with double-arrow. Press OK, then OK at <OK> TO BYPASS. Check BYPASSED shows.
- Panel: to restore a zone, select it, press OK, then the open-padlock key at <OFF> TO CLEAR.
- KP-160: tap the triangle-and-bar button beside 8 until the zone number shows, then tap the top-right house-with-padlock button.
Pages 5, 20, 22 to 24 of the PowerMaster-10/30 G2 Version 19.4 User's GuidePages 2, 15 and 16 of the KP-160 PG2 Keypad User GuidePanel double-arrow key Advance to the next menu item Panel OK key Open an option or confirm a setting Bypass duration Ends at the next disarm; fire zones cannot be bypassed Leave the panel menu Press the closed-padlock key, then OK at <OK> TO EXIT Alarm memoryOKor*master codeOK
- PowerMaster-10/30 G2 panel only; for KP-140/141, KP-160 or KP-250 see its own guide. MEMORY after disarming means an alarm record is stored.
- Press OK repeatedly to read the affected zones and events. The memory indication clears on the next arming.
- For the event log, press *, enter the master code, then OK for the newest event. Each further OK shows an older event.
- Leave the log with the closed-padlock key, then OK at <OK> TO EXIT.
Chime on or off8
- PowerMaster-10/30 G2 panel only: press 8 (the bell key). For KP-140/141, KP-160 or KP-250 see its own guide.
- Each press switches between CHIME ON and CHIME OFF. The panel’s green CHIME light is on when enabled.
- Only zones set as chime zones by your installer chime, while the system is disarmed.
Panic alarmholdthe key with a plus sign on it+the key with a flame on itthe key with a plus sign on it+the key with a flame on it
- PowerMaster-10/30 G2 panel: press the plus/shield and shield/flame keys together for panic. PANIC ALARM shows.
- To stop it at the panel, press the open-padlock key and enter your code.
- KP-160: hold both bottom alarm buttons together for about 2 seconds to send a panic request.
- Fire or emergency alone is a different alarm. KP-140/141: hold its + and flame keys together for about 2 seconds. KP-250: see its own guide.
Pages 5 to 7, 12, 63 of the PowerMaster-10/30 G2 Version 19.4 User's GuidePage 12 of the KP-160 PG2 Keypad User GuidePowerMaster-10/30 G2 panel Press both alarm picture keys together KP-140/141 Hold the + and flame keys together for about 2 seconds KP-160 Hold both bottom alarm symbols together for about 2 seconds Change a code
- PowerMaster-10/30 G2 panel only; for KP-140/141, KP-160 or KP-250 see its own guide. Only the master user can change codes; disarm first.
- Use the double-arrow key to reach USER SETTINGS, press OK and enter the master code. Find USER CODES and press OK.
- Enter the two-digit user number (01 is master), then OK. Enter the new 4-digit code and press OK to save.
- If SET PARTITIONS appears, press OK; use 1, 2, 3 to choose allowed partitions, then OK to save.
- To leave, press the closed-padlock key, then OK at <OK> TO EXIT. Change the factory master code promptly.
Pages 5, 20, 22, 25 and 26 of the PowerMaster-10/30 G2 Version 19.4 User's GuidePanel double-arrow key Advance to the next menu item Panel OK key Open an option or confirm a setting Test the system
- PowerMaster-10/30 G2 panel only; for KP-140/141, KP-160 or KP-250 see its own guide. Disarm, then use double-arrow to PERIODIC TEST.
- Press OK, enter your code, then OK at SIRENS TEST. Listen for each siren; follow <OK> TO CONTINUE for smoke-sensor sirens.
- Use OK or double-arrow to continue through TEMP/LIGHT TEST. At TEST ALL DEVICES press OK, then OK again to start.
- Open/close contacts and walk-test detectors as their guides describe. The untested-device count falls; activate each listed device.
- DEVICE TESTS END then READY means all were tested. Report failures to your installer. Test weekly and after an alarm.
Pages 5, 56 and 57 of the PowerMaster-10/30 G2 Version 19.4 User's GuidePanel double-arrow key Advance to the next menu item Panel OK key Open an option or confirm a setting Trouble lightsOK
- PowerMaster-10/30 G2 panel: orange TROUBLE, TRBL and three beeps each minute signal trouble. KP-141 and KP-250: see their own guides.
- On the panel, press OK again and again to read each trouble and where it is.
- It clears once the cause is fixed. If you don't know how, call your installer.
- To quiet panel trouble beeps for 4 hours, press the open-padlock key and enter your code, even if already disarmed.
- On the KP-160: a warning triangle means a trouble; a plug, mains failure; a crossed-out aerial, no contact with the panel; a battery, replace its batteries.
Pages 4 to 6, 17 to 19 of the PowerMaster-10/30 G2 Version 19.4 User's GuidePage 14 of the KP-160 PG2 Keypad User GuideAC FAILURE No mains power to that device CPU LOW BATTERY The panel's backup battery is weak and needs replacing LOW BATTERY A wireless device's battery is running out: replace it within 7 days MISSING A device hasn't reported to the panel for some time COMM. FAILURE A message couldn't be sent to the monitoring station or a phone LINE FAILURE There is a problem with the phone line TAMPER OPEN A detector reports its tamper switch open CLEAN ME A smoke detector needs cleaning
Why is my keypad beeping or showing a trouble light?
Most keypads beep or light up a trouble indicator when something needs attention, such as a low backup battery, a power cut or a lost phone or internet connection. Your user guide explains what each light or code means on your model. If it keeps happening, or you are not sure, call your installer or monitoring company.
All Visonic PowerMaster manuals
User guides 2
Nothing here matches that.
Try a shorter search, or search every brand.
More Visonic models
Is anyone watching your alarm?
An alarm that only makes a noise relies on someone hearing it. A monitored alarm reports to our A1 graded, NZSA approved control room, watched 24/7 by a team that is New Zealand owned and operated. We can monitor most existing alarms, so you may not need a new one. Thinking about a new alarm or security cameras? Ask us for a quote.
Prefer to talk now? Call us on 0800 339 999.
Home: alarm monitoringBusiness: business monitoringInstaller: bureau monitoring

Manuals are the property of their manufacturers and are provided for reference only; their inclusion here does not imply any endorsement by the manufacturer.