

Rascal manuals
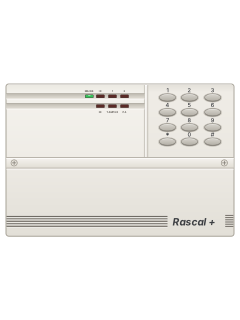
Rascal Super and Rascal+ cheat sheet
Arm (away)your code
- Close all doors and windows, and check nothing is blocking the motion detectors.
- Key in your four-digit code. The buzzer gives a steady tone while the exit time runs.
- Leave by your exit route and shut the door. The system sets when the exit time is up.
- Rascal Super: an open zone stops it setting. The buzzer pulses and the zone's light flashes: key in your code or press #, fix it, and start again.
- Rascal+: an open zone pauses the exit time, the buzzer pulses and its light comes on. Close it and the exit time starts again.
Arm while homeyour code*0oryour code*4
- Part set and Home set arm only part of the system: the zones your installer chose stay off. On a Rascal+ both leave zone 2 off.
- Part set: key in your code, then * and 0. The buzzer tone changes and the lights of the zones left off blink.
- Home set: your code, then * and 4 on a Rascal+, or your code, then * and 6 on a Rascal Super.
- The system sets when the exit time runs out. Rascal+ Home set keeps the outside bell and strobe quiet.
- Rascal Super: an error tone means that mode isn't set up on your system.
Disarmyour code
- When you come in the buzzer sounds. Go straight to the keypad by your entry route.
- Key in your code before the entry time runs out. The buzzer stops and the system is back in DAY mode.
- A hurry-up tone means the entry time is nearly over: the last 10 seconds on a Rascal Super, the last 15 on a Rascal+.
- Rascal+: a pulsing tone as you come in means there was an alarm while you were out.
Bypass a zoneyour code*zone
- Each detector or door contact is a zone, and Rascal calls bypassing isolating.
- Key in your code, then * and the zone number. Its light flashes, and the rest of the system sets when the exit time ends.
- Rascal+: put * before each zone to isolate more than one (code, *1, *2). The IX zone is number 3.
- Rascal Super: only zones your installer allows can be isolated. Any other gives an error tone, and the exit time carries on.
Alarm memoryyour code#
- After an alarm, key in your code. A two-tone sound means the system needs resetting.
- The light of the zone that alarmed first stays on. The lights of zones that alarmed after it flash.
- Rascal+: press #. Rascal Super: key in your code again, then press #.
- Rascal Super: an error tone means your installer has to reset it. Call them.
- For past alarms, key in your code, then *, 9 and 3. Press # to switch between set and unset logs, and * to leave.
Chime on or off*4*
- Rascal+: with the system unset, press * then 4, without your code. Chime there covers the entry/exit (FX) zone.
- Rascal+: the FX light on means chime is on. Do the same to turn it off, then press * to finish.
- Rascal Super: key in your code, then *, 9 and 5. Zones with chime on show their lights.
- Press a zone's number to switch its chime on or off, then * to finish. An error tone means chime isn't set up.
Change a codeyour code*91new code
- There is one code, four digits long.
- Key in your code, then *, 9 and 1. On a Rascal Super the four right-hand lights come on.
- Key in the new four-digit code.
- Rascal Super: a light goes out per digit, and an accept tone means it's saved. An error tone means choose another; the old code still works.
Test the systemyour code*9oryour code*94then*
- Key in your code, then * and 9. Every light comes on for about 10 seconds.
- Then the buzzer sounds for 5 seconds, then the outside siren, then the strobe if fitted. Rascal Super: * stops the test early.
- Walk test: key in your code, then *, 9 and 4. A steady tone starts.
- Set off each detector in turn: the buzzer gets loud to show it works. Press * to finish.
- Panic buttons, and fire detectors on a Rascal Super, aren't part of the walk test. On a Rascal+ a panic button sets off a real alarm.
Tamper alarmyour code#
- The panel, keypads, outside siren and wiring are watched all the time. Tampering sets off an alarm.
- While the system is unset, a tamper sounds inside only and the TAMPER light comes on.
- Key in your code to silence it. At the two-tone sound, press # to reset.
- Rascal+: a flashing TAMPER light after the reset means the fault is still there.
Every Rascal manual
User guides 1
Installer manuals 1
Nothing here matches that.
Try a shorter search, or search every brand.










Is anyone watching your alarm?
An alarm that only makes a noise relies on someone hearing it. A monitored alarm reports to our A1 graded, NZSA approved control room, watched 24/7 by a team that is New Zealand owned and operated. We can monitor most existing alarms, so you may not need a new one. Thinking about a new alarm or security cameras? Ask us for a quote.
Prefer to talk now? Call us on 0800 339 999.
Home: alarm monitoringBusiness: business monitoringInstaller: bureau monitoring

Manuals are the property of their manufacturers and are provided for reference only; their inclusion here does not imply any endorsement by the manufacturer.