
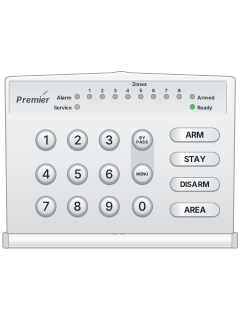
RKP4 / RKP8 / RKP16Premier LED keypad (original)

Texecom Premier 412 / 816 / 832 manuals
Start hereTexecom Premier 412 816 832 User GuideUser guide · 4 pages · 103 KBRead it nowKeypad cheat sheet
Arm (away)your codeARM
- Check the Ready light: steady means ready to arm. Off means a zone is open; zone lights or the LCD identify it.
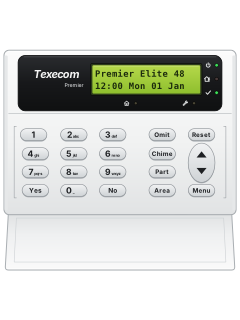
- RKP4/8/16: enter your code, then ARM. A 412/816/832 LCD keypad uses Yes. The exit tone starts.
- The Armed light flashes on an RKP keypad. Leave; the exit tone stops when the system has armed.
- If your installer has enabled quick arm, press ARM on RKP4/8/16, or Yes on a 412/816/832 LCD keypad, without a code.
- To cancel exit, enter your code then DISARM on RKP4/8/16, or No on a 412/816/832 LCD keypad.
Pages 2 and 3 of the Texecom Premier 412 816 832 User GuidePages 67 and 68 of the Texecom Premier 412 816 832 Installation ManualRKP4/8/16 Your code then ARM 412/816/832 LCD Your code then Yes Arm while homeyour codeSTAY
- Stay arming bypasses interior zones. Close protected doors and windows; check no perimeter zone is bypassed unintentionally.
- Enter your code, then STAY. It usually arms at once; the Armed light flashes slowly.
- If your installer has enabled quick arm, press STAY without a code.
- Once Stay armed, hold STAY until the confirmation tone for Instant Stay: entry doors then trigger an alarm immediately.
Disarmyour code
- During entry: come in through the entry door and key in your code at the keypad before the entry time runs out.
- At other times: your code then DISARM on RKP4/8/16, or No on a 412/816/832 LCD keypad. With one partition, the code alone works.
- The Armed light on the RKP keypad goes out; a 412/816/832 LCD keypad returns to its normal display.
- After an alarm, the keypad shows what caused it. The system must be reset before it can arm again.
Bypass a zoneyour codeBY PASS2-digit zoneMENU
- On the pictured RKP4/8/16 keypad, the bypass key is labelled BY PASS.
- Enter your code, then BY PASS. The Ready light flashes quickly.
- Enter each zone as 2 digits, such as 02 or 04. Each entered zone is bypassed.
- Press ARM to Away arm, STAY to Stay arm, or MENU to stay disarmed with the zones bypassed.
- Bypass the zone again to restore it. Bypasses otherwise stay until restored, unless your installer set them to clear on disarming.
Alarm memoryyour codeMENU1
- Key in your code, then press MENU, then 1.
- The keypad shows the zones that caused an alarm the last time the system was armed ('Last Alarm From' on an LCD keypad).
- Press MENU to go back.
- LCD keypads also keep a full event log: your code, then MENU, 6.
Chime on or offyour codeMENU4
- Chime sounds a tone each time a chime zone opens. Your installer picks the zones.
- Enter your code, then MENU and 4. On a 412/816/832 LCD keypad with Chime, your code then Chime also works.
- If chime was off it turns on and the keypad chimes. If it was on, it turns off and you hear the acceptance tone.
Reset after an alarmyour codeMENU0
- Reset clears alarms and service faults, and resets latching detectors such as smoke detectors.
- Enter your code, then MENU and 0. On a 412/816/832 LCD keypad with Reset, your code then Reset also works. The keypad bleeps.
- Some systems need an anti-code instead: your code, then MENU, 3 shows a 4-digit code.
- Quote that code to your installer or alarm receiving centre, then key in the reset number they give you.
Panic alarm4+6or1+3or7+9
- If your installer has turned these on, press both keys at the same time.
- 4 and 6: panic alarm (police). Your installer can make it silent.
- 1 and 3: fire alarm. 7 and 9: medical alarm.
Change a codeyour codeMENU5
- Enter your current code, then MENU and 5.
- Enter the new code. For 4 or 5 digits, press ARM on RKP4/8/16 or Yes on a 412/816/832 LCD keypad; 6 digits needs neither.
- Enter the new code again to confirm.
- An acceptance tone means it is saved. A low error tone means start again.
Page 3 of the Texecom Premier 412 816 832 User GuidePage 73 of the Texecom Premier 412 816 832 Installation ManualAccept a new 4- or 5-digit code RKP4/8/16: ARM; 412/816/832 LCD: Yes New 6-digit code No accept key before entering the code again to confirm Trouble lightsyour codeMENU2orMENU2
- A flashing Service light normally means a new fault that must be acknowledged before arming.
- Usually only the keypad buzzer sounds for a fault. Keying in your code silences it.
- Key in your code, then press MENU, 2. The faults show (on an LED keypad, as zone lights: see the table).
- Press MENU to acknowledge. The Service light stays on until the fault is fixed; LCD keypads show fault text.
- To look at standing faults later, press MENU, 2, then MENU when you're done.
Pages 3 and 4 of the Texecom Premier 412 816 832 User GuidePage 72 of the Texecom Premier 412 816 832 Installation Manual1 Mains (AC) power has failed 2 Phone line fault 3 2-wire smoke alarm 4 Box or auxiliary tamper, or auxiliary PA: press 4 for which 5 Date or time lost 6 Zone tamper or trouble: press 6 for the zone 7 Keypad tamper or removed: press 7 for the keypad 8 Equipment fault, such as battery, siren or communication: press 8 for which
Why is my keypad beeping or showing a trouble light?
Most keypads beep or light up a trouble indicator when something needs attention, such as a low backup battery, a power cut or a lost phone or internet connection. Your user guide explains what each light or code means on your model. If it keeps happening, or you are not sure, call your installer or monitoring company.
All Texecom Premier 412 / 816 / 832 manuals
Installer manuals 4
Nothing here matches that.
Try a shorter search, or search every brand.
More Texecom models
Is anyone watching your alarm?
An alarm that only makes a noise relies on someone hearing it. A monitored alarm reports to our A1 graded, NZSA approved control room, watched 24/7 by a team that is New Zealand owned and operated. We can monitor most existing alarms, so you may not need a new one. Thinking about a new alarm or security cameras? Ask us for a quote.
Prefer to talk now? Call us on 0800 339 999.
Home: alarm monitoringBusiness: business monitoringInstaller: bureau monitoring

Manuals are the property of their manufacturers and are provided for reference only; their inclusion here does not imply any endorsement by the manufacturer.