
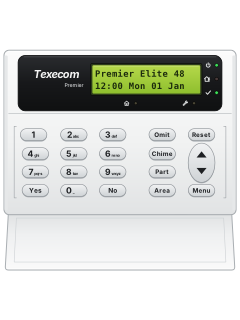
LCD keypad

Texecom Premier Elite manuals
Start herePremier Elite Series User GuideUser guide · 28 pages · 1.2 MBRead it nowKeypad cheat sheet
Arm (away)your codeYesorAreayour codethe key with a tick on itorthe key with a house on it
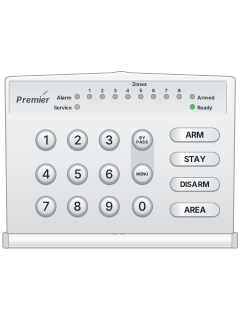
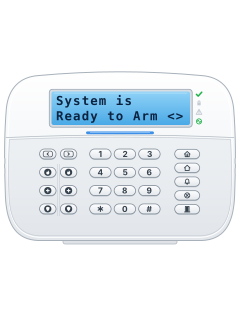
- Close all doors and windows. The Ready light (a tick on both pictured keypads) must be on.
- On the word-labelled Premier keypad, enter your code then Yes. On the brass flush keypad, enter your code then the tick key.
- The exit tone sounds. Leave; it stops when the system has armed.
- Quick arm, if your installer enabled it: press Area on the Premier keypad, or the outlined-house key on the brass flush keypad.
- On the brass PROX keypad, hold your tag over PROX. At Do You Want To Arm System?, present it again or keep holding it to arm.
Pages 2 and 3, 7 of the Premier Elite Series User GuideYes Premier: Yes; brass flush: tick Area Premier: Area; brass flush: outlined house Arm while homeyour codePart1Yesor1Partyour codethe key with a house with a person in it on it1the key with a tick on itor1the key with a house with a person in it on it
- Part arms 1 to 3 leave chosen zones off. Close protected doors and windows; the Ready tick light must be on.
- Enter your code, then Part on Premier, or the house-with-person key on the brass flush keypad. Press 1, 2 or 3.
- Press Yes (tick on brass flush) to arm, or Chime (musical note on brass flush) for silent arming.
- Leave the protected area. If sounding, the exit tone stops when the system has armed.
- If your installer enabled quick part arm: press 1, 2 or 3, then Part (house-with-person on brass flush).
Pages 2 and 3 of the Premier Elite Series User GuidePart Premier: Part; brass flush: house with a person Yes Premier: Yes; brass flush: tick Chime Premier: Chime; brass flush: musical note Disarmyour code
- Come in by your entry door. The entry tone starts.
- Enter your code before entry time ends. On the brass PROX keypad, presenting your tag also disarms. The entry tone stops.
- Outside entry time, enter your code then Yes on Premier, or the tick key on the brass flush keypad.
- If entry time runs out, the inside sounders go off, followed by the full alarm immediately or after a second entry time.
- To cancel exit, enter your code then Yes on Premier, or the tick key on the brass flush keypad. The exit tone stops.
Bypass a zoneyour codeOmitzoneOmitMenu
- On brass flush, Omit is the crossed-house key and Menu is the list key. The Premier keypad has word labels.
- If your code permits omitting, enter it then press Omit. Enter the zone number as 3 digits.
- A star right of the number means omitting is allowed. Press Omit: a star on the left marks it omitted. Repeat for other zones.
- Press Menu, then arm as normal. The crossed-house Omit light is on while zones are omitted.
- Omitted zones return at the next disarm, unless programmed otherwise. To restore one manually, repeat the omitting steps.
Pages 2, 5 of the Premier Elite Series User GuideOmit Premier: Omit; brass flush: crossed house Menu Premier: Menu; brass flush: list Alarm memoryyour codethenyour codeResetoryour codeMenuYesYesyour codethenyour codethe key with circling arrows on itoryour codethe key with three lines on itthe key with a tick on itthe key with a tick on it
- On brass flush, Reset is the circular-arrow key, Menu the list key, and Yes the tick. Premier has word labels.
- Enter your code to stop the sounders and see the zones that caused the alarm. Clear any displayed fault that needs attention.
- Enter your code again, then Reset. On a successful reset, the strobe stops, the keypad chimes and the normal display returns.
- If reset needs an engineer or anti-code, ring the number on the display or your alarm company.
- Event log: your code, Menu, Yes, Yes. Use the up/down rocker to scroll; press Reset twice to leave.
Pages 2, 4 to 6 of the Premier Elite Series User GuideReset Premier: Reset; brass flush: circular arrow Menu Premier: Menu; brass flush: list Yes Premier: Yes; brass flush: tick Chime on or offChimethe key with a musical note on it
- On Premier, press Chime. On the brass flush keypad, press the musical-note key. The chime tone means chime is on.
- Press the same key again to turn chime off; the error tone sounds.
- Only zones selected for chime make the inside sounders chime when opened.
- If programmed, the system may also turn chime on and off automatically.
Pages 2, 5 of the Premier Elite Series User GuideChime Premier: Chime; brass flush: musical note Panic alarmhold1+3orhold4+6orhold7+9
- Press and hold both keys for 2 seconds. Your installer must have turned the pairs on for your keypad.
- UK and non-UK panels swap the panic and fire pairs (see the table). Ask your installer which yours is.
- Panic can be set up to be silent, or to wait a short time first.
- Emergency pairs do not work while locked. Press Yes and No together to lock/unlock Premier; tick and cross together on brass flush.
Page 2 of the Premier Elite Series User Guide1 and 3 UK panel: panic alarm. Non-UK panel: fire 4 and 6 UK panel: fire. Non-UK panel: panic alarm 7 and 9 Medical alarm, on both Change a codeyour codeMenuYes2Yesnew codeYesyour codethe key with three lines on itthe key with a tick on it2the key with a tick on itnew codethe key with a tick on it
- On brass flush, Menu is the list key, Yes the tick, and Reset the circular arrow. Premier has word labels.
- If your code permits this, it changes that code only. The new code can have 4, 5 or 6 digits.
- Enter your current code, then Menu, Yes, 2 and Yes.
- Enter the new code, then Yes to save. Press Reset to leave.
- Memorise the new code first; if you forget it, an engineer must programme another one.
Pages 2, 6 of the Premier Elite Series User GuideMenu Premier: Menu; brass flush: list Yes Premier: Yes; brass flush: tick Reset Premier: Reset; brass flush: circular arrow Set the date and timeyour codeMenuYes7YestimeYesoryour codeMenuYes8YesdateYesyour codethe key with three lines on itthe key with a tick on it7the key with a tick on ittimethe key with a tick on itoryour codethe key with three lines on itthe key with a tick on it8the key with a tick on itdatethe key with a tick on it
- On brass flush, Menu is the list key, Yes the tick, and Reset the circular arrow. Premier has word labels.
- Enter your code, then Menu and Yes.
- Press 7 for time or 8 for date, then Yes.
- Enter the new time or date with the number keys, then Yes.
- Press Reset to return to the normal display.
Pages 2, 6 of the Premier Elite Series User GuideMenu Premier: Menu; brass flush: list Yes Premier: Yes; brass flush: tick Reset Premier: Reset; brass flush: circular arrow Trouble lightsyour code
- SYSTEM ALERTS on the display means faults or alarms are waiting: key in your code and they scroll past.
- Once you've noted them, key in your code and press Reset (the circular arrow on the brass flush keypad). The system chimes and the display returns to normal.
- Some faults must be put right before the system will reset.
- Both pictured keypads use symbols for the lights: power, house/person (Info), tick (Ready), spanner (Service), crossed house (Omit).
Pages 2, 4 and 5 of the Premier Elite Series User GuidePower light on Mains power is on Power light flashing No mains power: running on the backup battery Service light on The system needs attention: contact your installer Ready light on Every zone is closed: ready to arm Ready light off A zone is open Ready light flashing A force-omit zone is open: check it before arming Info light on Armed (unless set up to show something else) Omit light on One or more zones are omitted
Why is my keypad beeping or showing a trouble light?
Most keypads beep or light up a trouble indicator when something needs attention, such as a low backup battery, a power cut or a lost phone or internet connection. Your user guide explains what each light or code means on your model. If it keeps happening, or you are not sure, call your installer or monitoring company.
All Texecom Premier Elite manuals
User guides 1
Nothing here matches that.
Try a shorter search, or search every brand.
More Texecom models
Is anyone watching your alarm?
An alarm that only makes a noise relies on someone hearing it. A monitored alarm reports to our A1 graded, NZSA approved control room, watched 24/7 by a team that is New Zealand owned and operated. We can monitor most existing alarms, so you may not need a new one. Thinking about a new alarm or security cameras? Ask us for a quote.
Prefer to talk now? Call us on 0800 339 999.
Home: alarm monitoringBusiness: business monitoringInstaller: bureau monitoring
Manuals are the property of their manufacturers and are provided for reference only; their inclusion here does not imply any endorsement by the manufacturer.