
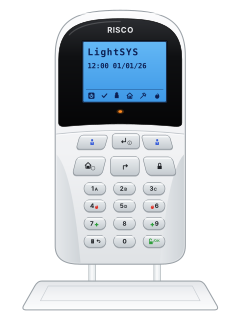
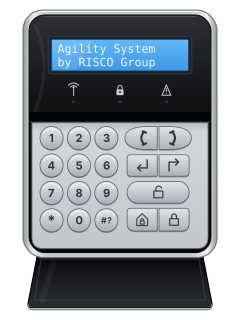
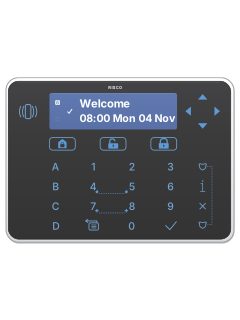
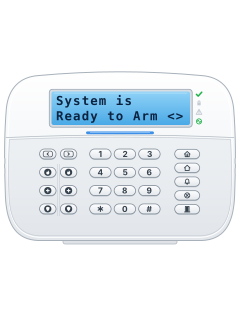
RP432KPLCD keypad

Risco LightSYS manuals
Start hereLightSYS Plus User ManualUser guide · 104 pages · 2.0 MBRead it nowKeypad cheat sheet
Arm (away)your codethe key with a padlock on it
- Check the tick (Ready) icon is on; flashing slowly is fine (only the entry/exit door is open). Won't arm? Scroll to read why.
- Key in your code, then press the Away key (the closed padlock). Three short beeps mean a wrong code: key it in again.
- If your installer set up quick arming, the Away key on its own does it. On a Slim keypad, press Away first, then your code.
- The keypad beeps slowly and the padlock icon flashes during the exit time. Leave and close the door.
- Once armed, the padlock icon stays on (the LightSYS keypad's red light too). Plus and Air also show ARMED.
Pages 19, 58 and 59, 99 of the LightSYS Plus User ManualPages 6, 23 and 24 of the LightSYS 2 User ManualClosed-padlock key Away (full) arming Padlock icon flashing Exit time: leave now Padlock icon steady Armed Three short beeps Wrong code: key it in again Arm while homeyour codethe key with a house on ityour codethe key with a house with a person in it on it
- LightSYS 2 calls this Part Set; Plus and Air call it Stay. Only the perimeter zones your installer chose arm.
- Key in your code, then press the Stay key (a house). With quick arming set up, the Stay key on its own does it.
- During the exit time the keypad beeps, the padlock icon flashes and the house icon comes on.
- Once armed, the house and padlock icons both stay on. Plus and Air also show AT HOME ARMED.
- On a Slim keypad, press Stay first, then your code.
Pages 6, 24 and 25 of the LightSYS 2 User ManualPages 19, 60 and 61 of the LightSYS Plus User ManualHouse key Stay (partial) arming Padlock icon flashing, house icon on Exit time running House and padlock icons steady Stay armed Disarmyour codeOKyour codethe key with an open padlock on it
- These keys are for the LCD and Panda keypads, where OK is the open padlock. On an Elegant, key in your code, then press its open padlock.
- Opening the entry door starts the entry time, and the keypad beeps. Disarm before it runs out; the padlock icon goes out.
- More than one partition? Plus and Air: press the disarm key again at All?. LightSYS 2: press 0 for all of them, then OK.
- Disarming also silences an alarm (see Alarm memory). On a Slim keypad, press the open padlock first, then your code.
- Under threat, key in the duress code instead of yours, then the disarm key. It disarms and silently alerts your monitoring company.
Bypass a zoneyour codethe key with a down arrow on it
- Each detector or door contact is a zone (LightSYS 2 says omit). Bypassing works only if your installer has turned it on.
- Key in your code but not OK, then press the bypass key: the bent arrow (Panda: two arrows; Elegant: the down arrow).
- Scroll to the zone and press the Stay key (a house) to change it to Y. Do the same for any other zones.
- Press OK when done (Elegant: the tick key), then arm as usual.
- The bypass lasts for the next arming only. A permanent bypass is in the menus, under Activities.
Pages 19, 54 to 56 of the LightSYS Plus User ManualPages 3, 5, 40 of the LightSYS 2 User ManualBypass key LCD keypad: bent arrow. Panda: two arrows. Elegant: down arrow Stay key (a house) Changes N to Y: the zone is bypassed OK (Elegant: tick) Saves and leaves Alarm memoryyour codeOKyour codethe key with a tick on it
- OK is the open-padlock key on the LCD and Panda keypads; on an Elegant keypad, use the tick key instead.
- After an alarm the padlock icon flashes fast. Disarm, then scroll to see the zones that went off.
- Later: your code, then OK (LightSYS 2: EXIT, the back-arrow key, first). Then View, OK, Alarm Memory, OK. Scroll through the last 5 alarms.
- CALL INSTALLER on the screen? Press EXIT, then OK at Anti-Code, and read the number shown to your installer or monitoring company.
- Key in the anti-code they give you, then press OK. The system resets.
Chime on or offyour codeOKyour codethe key with a tick on it
- OK is the open-padlock key on the LCD and Panda keypads; on an Elegant keypad, use the tick key instead.
- Chime beeps the keypad when a chosen zone opens while the system is disarmed. Your installer picks the zones.
- Key in your code and press OK (LightSYS 2: EXIT first). Go to Activities, OK, Keypad Sound, OK, then Chime, OK.
- Choose Keypad Chime for this keypad, or Partition Chime: all keypads on Plus/Air, this partition on LightSYS 2. Press OK.
- Scroll to ON or OFF and press OK. Plus and Air confirm with LOCAL CHIME (or GLOBAL CHIME) ON or OFF.
Panic alarmholdthe key with a shield on it+the key with a shield on itorhold4+5orhold7+8holdthe key with a person on it+the key with a person on itorhold4+6orhold7+9holdthe key with a shield on it+the key with a shield on itorhold4+6orhold7+9
- Each keypad uses its own keys, listed below. Hold the pair together for 2 seconds.
- Your installer decides whether these keys work, sound at the house and report to your monitoring company.
Pages 20, 76 and 77 of the LightSYS Plus User ManualPages 3, 5 and 6, 32 of the LightSYS 2 User ManualLightSYS LCD keypad Panic: the two police-officer keys. Fire: 4 and 6. Emergency: 7 and 9 Panda keypad Panic: the two police badge keys. Fire: 4 and 6. Emergency: 7 and 9 Elegant keypad Panic: the two shield keys (top and bottom right). Fire: 4 and 5. Emergency: 7 and 8 Slim keypad Panic: 1 and 2. Fire: 3 and 4. Emergency: 5 and 6 Change a codeyour codeOKyour codethe key with a tick on it
- OK is the open padlock on the LCD and Panda keypads (Elegant: the tick key). With the system disarmed, key in your code and press OK (LightSYS 2: EXIT first).
- Go to Codes/Tags, OK, then Define, OK. Scroll to the user and press OK.
- At Edit Code (Edit My Code if you aren't the Grand Master), press OK. Key in the new code and press OK.
- One beep (ACCEPTED on Plus and Air) means it worked. Three beeps mean it didn't take.
- The Grand Master can change any code; most users can change only their own.
Set the date and timemaster codeOKmaster codethe key with a tick on it
- OK is the open-padlock key on the LCD and Panda keypads; on an Elegant keypad, use the tick key instead.
- LightSYS Plus and Air connected to the Cloud set their own clock. On LightSYS 2, a Clock Not Set fault means it needs setting.
- Key in the Grand Master code and press OK (LightSYS 2: EXIT first). Go to Clock, OK, then Time & Date, OK.
- Key in the time and date as the screen shows them, moving along with the scroll keys. LightSYS 2 uses 24-hour time.
- On LightSYS 2, the house or closed-padlock key changes date choices. Press OK to save.
Trouble lightsholdi
- A fast-flashing power icon, or the warning triangle on a Panda, means there is a trouble.
- Elegant: hold i for 2 seconds to see system status, or use the View menu below for troubles.
- To read it: your code, then OK (Elegant: the tick; LightSYS 2: EXIT first). Go to View, OK, then Trouble (Fault on LightSYS 2), OK, and scroll.
- On an LCD or Panda keypad, hold OK for 2 seconds to stop the trouble beeps.
- Clock lost: set the time and date. Mains power lost: check the panel's power is connected and switched on. Anything else: call your installer.
Pages 15, 19, 51, 97, 99 of the LightSYS Plus User ManualPages 5, 12, 22, 52 of the LightSYS 2 User ManualLCD/Elegant: power icon flashing fast A trouble: see View, then Trouble LCD/Elegant: power icon off No power Tick (Ready) off Not ready: a zone is open Tick flashing slowly Ready, with the entry/exit door open Padlock flashing slowly / fast Exit time running / alarm House icon on Stay armed, or a zone is bypassed LCD/Elegant: flame on / flashing Fire alarm / fire circuit trouble Tamper icon on Tamper alarm Send a test signal
- LightSYS Plus and Air only: our LightSYS 2 manual doesn't show this test.
- Key in the Grand Master code and press OK (Elegant: the tick). At Activities, press OK.
- Scroll to Advanced and press OK, then scroll to MS Test and press OK.
- When the screen confirms it has gone (see the table), press any key to finish.
Pages 41, 95 of the LightSYS Plus User ManualPage 33 of the LightSYS Air User ManualDONE HIT ANY KEY, and a confirmation beep The test message has been sent to the monitoring station
Why is my keypad beeping or showing a trouble light?
Most keypads beep or light up a trouble indicator when something needs attention, such as a low backup battery, a power cut or a lost phone or internet connection. Your user guide explains what each light or code means on your model. If it keeps happening, or you are not sure, call your installer or monitoring company.
All Risco LightSYS manuals
User guides 4
Nothing here matches that.
Try a shorter search, or search every brand.
More Risco models
Is anyone watching your alarm?
An alarm that only makes a noise relies on someone hearing it. A monitored alarm reports to our A1 graded, NZSA approved control room, watched 24/7 by a team that is New Zealand owned and operated. We can monitor most existing alarms, so you may not need a new one. Thinking about a new alarm or security cameras? Ask us for a quote.
Prefer to talk now? Call us on 0800 339 999.
Home: alarm monitoringBusiness: business monitoringInstaller: bureau monitoring

Manuals are the property of their manufacturers and are provided for reference only; their inclusion here does not imply any endorsement by the manufacturer.