
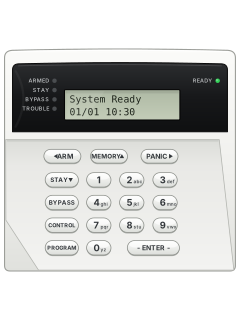
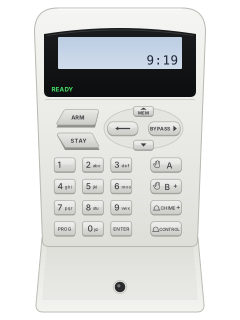
LCD keypad (landscape) and TRX wireless keypad

Arrowhead Elite 16D / 64 manuals
Start hereElite 16D V6 Operating GuideUser guide · 20 pages · 83 KBRead it nowKeypad cheat sheet
Arm (away)ARMoryour codeENTERorARMyour codeENTER
- Your installer picks one of three ways: [ARM] alone, your code then [ENTER], or [ARM], your code, then [ENTER].
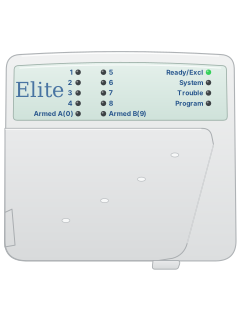
- On the 16D LED keypad, the light for each area you armed (A, B or C) comes on.
- On an Elite 64 the LCD screen shows which areas are armed, and a Crow LCD keypad lights ARMED.
- Forgot something? If your installer allows it, [ARM] during the exit time disarms again.
- Keyed a code wrong? Press [ENTER] to clear it and start again.
Arm while homeSTAYorSTAYyour codeENTER
- Stay mode arms only the part your installer picked, such as rooms you don't use at night.
- Press [STAY], or [STAY] then your code and [ENTER], depending on how your installer set it up.
- On the 16D LED keypad the area lights flash while stay mode is on. On an Elite 64, a Crow LCD keypad lights STAY and the screen shows the areas.
- Press [ENTER] straight after arming to arm at once. It also drops the entry delay, so a triggered stay zone alarms straight away.
Disarmyour codeENTER
- Key in your code and press [ENTER]. The armed lights go out.
- Stay mode: your code and [ENTER], or [STAY] on its own if your installer allows it.
- Your code and [ENTER] also stop an alarm and turn the sirens off.
- If it won't reset, the alarm was in an area your code or this keypad doesn't cover.
- Four wrong codes in a row set off a wrong-code alarm. A correct code resets it.
Bypass a zoneBYPASS2-digit zoneENTER
- Each detector or door contact is a zone. Bypass the ones you want left off, before you arm.
- Press [BYPASS], key in each zone as two digits (01, 09, 16), then press [ENTER].
- On the 16D LED keypad the BYPASS light then flashes. On an Elite 64 the Bypass light comes on.
- Bypasses clear when you disarm. A bypassed 24-hour zone stays bypassed until you take it off yourself.
- You can only bypass zones in the areas your keypad is set up for.
Alarm memoryMEMMEMORYMEMORY
- Crow LCD keypad: press [MEM]. On the Arrowhead LCD keypad or the 16D LED keypad, press [MEMORY].
- Faults still present show first, then the events, newest first. The memory holds the last 255 events.
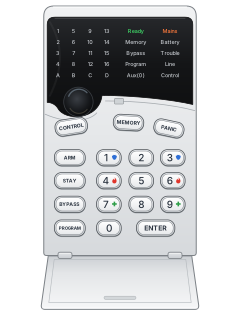
- On the 16D LED keypad a flashing MEMORY light means a new event, and the events play back with a beep between each.
- On an Elite 64 the LCD shows 'New Event(s)' when there is one, and each press shows the next event.
- Press [ENTER] to stop.
Chime on or offholdCHIMEholdCONTROLthenPROGRAMCONTROLthenPROGRAM
- Crow LCD keypad: hold [CHIME] for 2 seconds. The screen shows CHIME OFF or CHIME ON.
- Arrowhead LCD keypad (no CHIME key): hold [CONTROL] and press [PROGRAM] within 2 seconds. The screen shows Chime Off or Chime On.
- 16D LED keypad: press [CONTROL], then [PROGRAM]. The CONTROL light stays on while chime is off.
- Chime (day) zones beep the keypad when opened. Your installer sets them up and decides if you can turn them off.
- Do the same again to turn chime back on.
Panic alarmCHIME+CONTROLPANICor1+3PANICor1+3
- Crow LCD keypad (with A, B and CHIME keys): [CHIME] and [CONTROL] together for panic, [A] and [B] for fire, [B] and [CHIME] for medical.
- Arrowhead LCD keypad or 16D LED keypad: [PANIC], or [1] and [3] together. [4] and [6] send a fire alarm, [7] and [9] a medical alarm.
- Your installer decides which of these work, and whether [PANIC] needs a 2-second hold.
- Your code and [ENTER] reset the alarm.
Change a codePROGmaster codeENTERthenPROGuser numberENTERnew codeENTERPROGRAMmaster codeENTERthenPROGRAMuser numberENTERnew codeENTERPROGRAMmaster codeENTERthenPROGRAMuser numberENTERnew codeENTER
- Crow LCD: use [PROG]. Arrowhead LCD or LED: use [PROGRAM] throughout. Disarm, then press that key, your master code and [ENTER].
- The Crow LCD shows CLIENT MODE; the LED keypad lights PROGRAM. Press the program key, the user number and [ENTER]. Any code there shows.
- Users: 1 to 50 on a 16D, 1 to 100 on an Elite 64. Key in the new code (1 to 6 digits), then [ENTER]. Three short beeps mean saved; a long tone means rejected.
- To delete instead: LCD keypad, hold [CONTROL] and press [0] within 2 seconds, then [ENTER]. 16D LED keypad: [BYPASS], then [ENTER].
- Finish with the program key, then [ENTER].
Set the date and timePROG824ENTERtimeENTERorPROG819ENTERtimeENTERPROGRAM824ENTERtimeENTERorPROGRAM819ENTERtimeENTERPROGRAM824ENTERtimeENTER
- Crow LCD: use [PROG]. Arrowhead LCD or LED: use [PROGRAM] throughout. Press that key, your master code and [ENTER] to start.
- For each item, press the program key, its number from the table, [ENTER], then the value and [ENTER].
- The time is on the 24-hour clock (1830 is 6:30 pm). The year is two digits.
- Finish with the program key, then [ENTER].
Pages 8 to 10 of the Elite 16D V6 Operating GuidePages 8, 10 of the Elite 64 User GuideDay (1 = Sunday, 7 = Saturday) Elite 16D: 823. Elite 64: 818 Time (HHMM) Elite 16D: 824. Elite 64: 819 Date (1 to 31) Elite 16D: 825. Elite 64: 820 Month (1 to 12) Elite 16D: 826. Elite 64: 821 Year (2 digits) Elite 16D: 827. Elite 64: 822 Trouble lights
- On the 16D LED keypad, a flashing light points to a problem (see the table).
- On that keypad, press [MEMORY] to check. Current faults show first: MEMORY, MAINS and BATTERY light up with a zone light 1 to 8.
- No zone light at that point means no current fault. Press [ENTER] to leave.
- On an Elite 64, an LCD keypad names the faults when you press its memory key, or shows 'No current Faults'.
- Beeping: a phone line fault, or a wireless detector or zone gone quiet, depending on your installer's set-up. Any key stops it.
Pages 10, 23 of the Elite 16D V6 ManualPage 16 of the Elite 16D V6 Operating GuideBATTERY flashing Backup battery low MAINS flashing Mains power off LINE flashing Phone line fault, or the monitoring company didn't acknowledge TAMPER flashing (Trouble on a Crow LED keypad) New tamper alarm (on steady: tamper still there) Zone light on / flashing Zone open / zone in alarm Memory check: light 1, 2, 3, 4 Battery low; mains or 12 V fuse; phone line; wireless detector battery low Memory check: light 5, 6, 7, 8 Remote battery low; wireless detector not reporting; zone inactivity; monitoring call not acknowledged TROUBLE on (Elite 64 LCD keypad) A trouble alarm: the memory shows which
Why is my keypad beeping or showing a trouble light?
Most keypads beep or light up a trouble indicator when something needs attention, such as a low backup battery, a power cut or a lost phone or internet connection. Your user guide explains what each light or code means on your model. If it keeps happening, or you are not sure, call your installer or monitoring company.
All Arrowhead Elite 16D / 64 manuals
User guides 3
Installer manuals 4
Nothing here matches that.
Try a shorter search, or search every brand.
More Arrowhead models
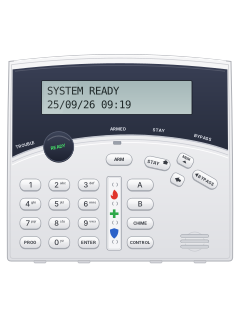
Crow wide LCD keypad (PowerWave CR16M)
Keypads
8 manuals
Also fitsElite V8 / V6 Powerwave, 15 manualsElite 16D / 64, 7 manuals
Is anyone watching your alarm?
An alarm that only makes a noise relies on someone hearing it. A monitored alarm reports to our A1 graded, NZSA approved control room, watched 24/7 by a team that is New Zealand owned and operated. We can monitor most existing alarms, so you may not need a new one. Thinking about a new alarm or security cameras? Ask us for a quote.
Prefer to talk now? Call us on 0800 339 999.
Home: alarm monitoringBusiness: business monitoringInstaller: bureau monitoring

Manuals are the property of their manufacturers and are provided for reference only; their inclusion here does not imply any endorsement by the manufacturer.