
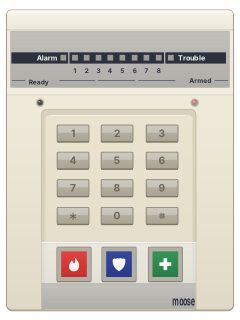
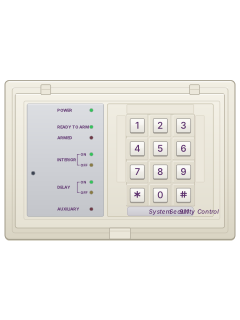
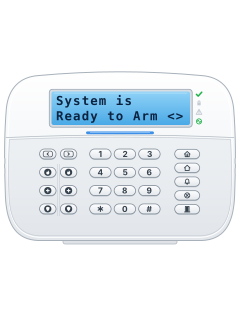
Z800R88-zone LED keypad (Z800 portrait case)

Moose Z800 manuals
Start hereMoose Z800 Security System Control User GuideUser guide · 36 pages · 664 KBRead it nowKeypad cheat sheet
Arm (away)your code
- Check READY is on before arming. On an LED keypad, lit zone indicators show which areas are open.
- Key in your user code. The keypad beeps and the red ARMED light blinks while the exit time runs.
- Leave straight away. The beeps speed up in the last 10 seconds, and the ARMED light goes steady once armed.
- A three-second error tone means it didn't arm because something is still open.
- If your installer set up two-digit arming, the first two digits of your code arm it. Disarming needs the whole code.
Arm while homehold4thenyour code
- Before arming, hold [4] for three seconds to turn off the inside detectors. On an LED keypad, their zone lights flash.
- For instant entry-door alarms too, hold [5] for three seconds before arming. ARMED will not blink after arming.
- Then enter your user code to arm.
- The inside detectors come back on when you disarm, unless your installer changed that.
Disarmyour code
- Come in through your entry door. The keypad sounds a steady tone to remind you.
- Key in your user code. The red ARMED light goes out.
- If an alarm has happened while you were out, stay outside and call for help. On LED keypads, ALARM indicates an alarm.
Bypass a zone#zone
- Each detector or door contact is a zone. Disarm first.
- Press [#], then the zone number. On an LED keypad, that zone indicator blinks.
- Repeat for other zones. [#] and the same number again puts a zone back.
- [#] then [9] cancels all bypasses. [#] then [0] bypasses every open zone, if your system allows it.
- On LED keypads, zone flashing stops 30 seconds after arming.
Alarm memoryhold3oryour codethen*hold3
- On LED keypads, enter your code after an alarm. ALARM stays on and zone lights show what triggered it.
- On LED keypads, no zone light means a panic key triggered it. Note the zones, then press [*] to clear ALARM.
- To recall the last alarm while disarmed, hold [3] for three seconds. Three beeps; LED keypads light the relevant zones.
- For the LCD memory display, see its own guide. Tell your monitoring company straight away about a false alarm.
Chime on or offhold6
- With the alarm disarmed, hold [6] for three seconds.
- Three beeps: chime is on. The keypad then beeps twice when a door or window zone opens.
- Hold [6] again: two beeps means chime is off. Inside zones never chime.
Reset smoke detectorshold7
- After a fire alarm, press [*] to quiet the keypad and siren, then key in your user code to clear it.
- On an LED keypad, TROUBLE may remain on because a smoke detector is latched or wiring is faulty.
- Hold [7] for three seconds to reset the smoke detectors.
- If the trouble remains after resetting, call your installer.
Panic alarmholdthe key with a flame on itorholdthe key with a shield on itorholdthe key with a cross on it
- Use a panic key below the digits: a flame, a shield or a cross.
- Your installer must enable the keys and tells you which emergency each sends and whether it is silent.
- Hold the chosen key for three seconds. If programmed for double presses, press it twice within three seconds.
- To reset, enter your code. On an LED keypad, [*] clears the ALARM light.
Change a codehold9thenmaster codeuser number#new code
- With the alarm disarmed, hold [9] for three seconds: three beeps.
- Key in the master code: two beeps, and the READY and ARMED lights blink in turn.
- Press the code number (2 to 8, or 1 for the master code), then [#]. Three beeps.
- Key in the new 4-digit code. A short then a long beep means it's saved, and programming ends.
- Made a mistake? Press [*] five times and start again. Pick a code that is hard to guess.
Test the systemhold8
- Disarm and close everything so the READY light is on.
- Hold [8] for three seconds: three beeps mean test mode.
- Open each door and window and walk past each detector. The keypad beeps; on LED keypads, the tested zone indicator lights.
- Press [*] when you've finished.
Trouble lightshold2
- If a keypad beeps for a trouble, press [*] to quiet it.
- LED keypads: the Trouble light means a problem. Hold [2] for three seconds; zone lights show which (see the table).
- The lights go back to normal after 8 seconds.
- Once the battery has recharged after a power cut, hold [7] to clear the low-battery trouble.
- A communication trouble clears once the panel gets through. Tell your security company about any trouble.
Pages 2, 5, 19 of the Moose Z800 Security System Control User GuidePages 13, 28 to 31, 49 of the Z800 InstallZone 1 Mains (AC) power has failed Zone 2 Low battery, or an output is overloaded Zone 3 A supervised zone, such as a fire zone, is open or shorted Zone 4 It couldn't get through to the monitoring centre Zone 5 Memory error: call for service Zone 6 A keypad is missing (its data wire is off) Zone 8 lit during the check (8-zone keypad) Chime is on: not a trouble Ready or Armed lit during the check Inside zones are off, or the entry delay is off: not a trouble
Why is my keypad beeping or showing a trouble light?
Most keypads beep or light up a trouble indicator when something needs attention, such as a low backup battery, a power cut or a lost phone or internet connection. Your user guide explains what each light or code means on your model. If it keeps happening, or you are not sure, call your installer or monitoring company.
All Moose Z800 manuals
Installer manuals 1
Nothing here matches that.
Try a shorter search, or search every brand.
More Moose models
Is anyone watching your alarm?
An alarm that only makes a noise relies on someone hearing it. A monitored alarm reports to our A1 graded, NZSA approved control room, watched 24/7 by a team that is New Zealand owned and operated. We can monitor most existing alarms, so you may not need a new one. Thinking about a new alarm or security cameras? Ask us for a quote.
Prefer to talk now? Call us on 0800 339 999.
Home: alarm monitoringBusiness: business monitoringInstaller: bureau monitoring

Manuals are the property of their manufacturers and are provided for reference only; their inclusion here does not imply any endorsement by the manufacturer.